
Many users feel the necessity of making their boot into safe mode in many urgent situations. This article will help you find out how to do it.
If your Mac is running slow, apps are crashing, or you suspect software conflicts, starting in Safe Mode can help diagnose issues. This special environment can disable non-essential software and run checks to fix minor system glitches.
But many users aren't sure how to access Safe Mode on Mac, especially with recent changes in Apple Silicon models. Here’s how to do it safely and effectively.
What You’ll Learn in This Guide
- The purpose and benefits of Safe Mode on Mac.
- Step-by-step instructions for both Intel and Apple Silicon Macs.
- Tips for troubleshooting while in Safe Mode.
- Best practices for exiting Safe Mode and restoring normal use.
1. Understand What Safe Mode Does on Mac
1.1 What is Safe Mode?
- Safe Mode is a startup environment where macOS loads only essential system extensions.
- It disables unnecessary software, login items, and kernel extensions.
- Intermediate disk-checks and cache clearing processes occur during this mode.
1.2 Why Use Safe Mode?
- Diagnose startup, performance, and software issues.
- Identify problematic login items or extensions.
- Perform maintenance and system repairs.
How to Boot Into Safe Mode on MacOS?
The booting into safe mode approach is different depending on the architecture of the chipset on your Mac. Here they are:
1. Boot Into Safe Mode on an Intel-based Mac
1.1 Prepare Your Mac
- Ensure your Mac is shut down completely (not just sleeping).
- Unplug all unnecessary external devices for a smoother boot.
1.2 Enter Safe Mode
- Press the power button to start your Mac.
- Immediately press and hold the Shift key.
- Release the Shift key when you see the login window.
- Log in. You might need to log in twice. “Safe Boot” should appear in the top-right corner.
2. Boot Into Safe Mode on an Apple Silicon (M1/M2) Mac
2.1 Prepare Your Apple Silicon Mac
- Completely shut down your Mac.
- Disconnect any peripherals you don’t need for troubleshooting.
2.2 Enter Safe Mode
- Press and hold the power button until you see “Loading startup options.”
- Select your startup disk (usually “Macintosh HD”).
- Press and hold the Shift key, then click “Continue in Safe Mode.”
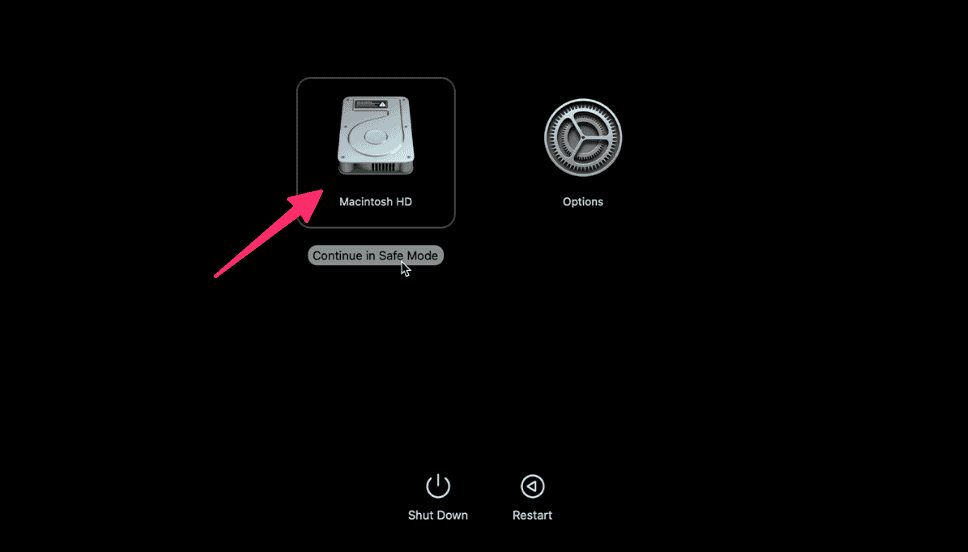
- Release Shift and log in to your account. “Safe Boot” should appear at the login window.
What to Do While in Safe Mode
1. Troubleshoot Problems
- Open essential apps and check if problems persist.
- If issues don’t appear, third-party software might be the culprit.
- Check system settings, user accounts, and disk health.
2. Update or Remove Conflicting Software
- Update outdated drivers, apps, or extensions.
- Move suspicious login items or startup agents to another location for testing.
Exit Safe Mode and Return to Normal Boot
- Click the Apple menu () and select Restart.
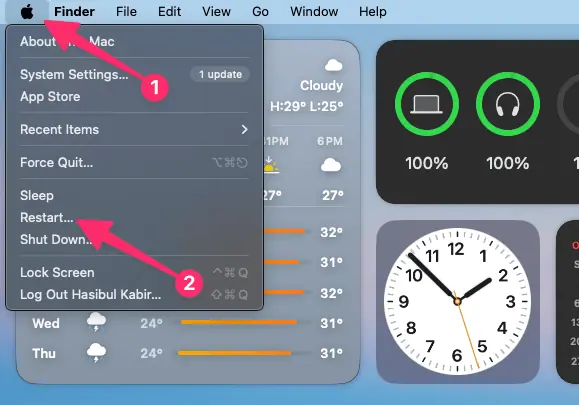
- Allow your Mac to reboot normally. Safe Mode will be disabled.
Tips and Best Practices for Using Safe Mode on Mac
- Use Safe Mode only when troubleshooting persistent issues; it disables key functionalities.
- Always back up important data before making significant software changes or removals.
- If Safe Mode doesn’t resolve your problem, consider booting into macOS Recovery for advanced repairs.
- Remember that some features (Wi-Fi, graphics, etc.) may run at reduced performance while in Safe Mode.
Knowing how to enter into safe mode on Mac can be invaluable when troubleshooting—especially as Macs evolve. Follow these steps carefully, and use Safe Mode as a foundational step toward a healthy, stable system.