Ever plugged your external monitor into your Mac, only to find macOS recognizes the monitor as a TV? Suddenly, your colors look washed out, everything feels slightly off, and you’re stuck in “TV mode” with limited refresh rates or even weird overscan? Don’t worry. You’re not alone, and this guide will help you solve it!
When macOS mistakes your external monitor for a TV, you may see incorrect colors, fuzzy text, and limited resolution options. Also, it often forces a color profile (YCbCr) or broadcast refresh rate, causing unexpected image quality problems. These problems may be due to the HDMI connection, cable issues, or macOS settings.
Why Does macOS Think My Monitor is a TV?

This issue usually happens when you connect your monitor via HDMI (or sometimes USB-C-to-HDMI adapters). macOS relies on something called EDID (Extended Display Identification Data) to “handshake” with the monitor. If the monitor reports itself as a TV (or the cable/adapter miscommunicates), macOS says “Cool, TV time!”, and suddenly, you get subpar image quality.
- Washed out or dull colors
- Limited resolution/refresh rate options
- “TV” label in Display settings
- Black bars or overscan/underscan issues
How to Fix macOS Recognizes Monitor as TV
Follow these essential troubleshooting steps if macOS recognizes your monitor as TV. Before making changes, consider the following pre-checks:
- Verify your monitor supports your desired resolution and refresh rate.
- Ensure both macOS and your monitor firmware are up to date.
- Try a different cable if available.
- Disconnect any adapters and directly connect the monitor when possible.
- Remove all cables, wait 10 seconds, and reconnect using the preferred method.
If the problem still exists, follow these methods one by one to fix the problem:
1. Check Your Cable and Ports
Start simple! Many times, the problem is the cable or port:
- Switch to DisplayPort (if available): macOS is much better at handling DisplayPort. Try a direct DisplayPort-to-DisplayPort (or USB-C to DisplayPort) connection.
- Try a different HDMI cable: Some cheap cables can misreport signals. Use a certified, good-quality cable.
- Avoid adapters if possible: USB-C to HDMI adapters can sometimes confuse macOS.
2. Adjust Display Settings Manually
Change your monitor’s settings in macOS to correctly configure resolution and color profiles.
- Click on the Apple icon on the menu bar and then, go to System Settings (or System Preferences on old macOS versions).
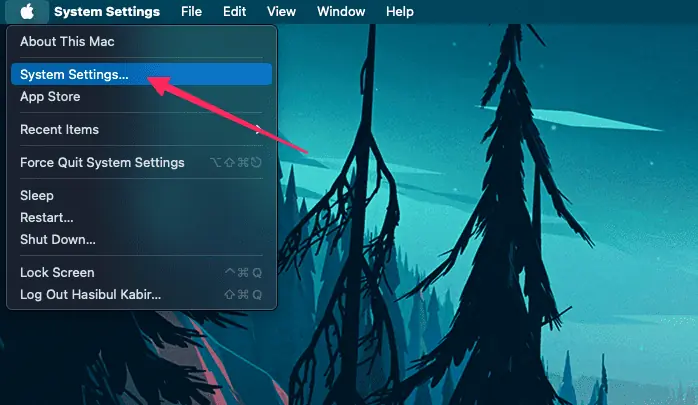
- Go to Displays.

- Hold the Option key and click the Scaled option to display more resolutions.
- Choose the native resolution and a refresh rate supported by your monitor.
- If available, select “Show low resolutions” and try those to see if the problem resolves.
3. Update macOS and Monitor Firmware
Updates can resolve bugs that cause misidentification of displays.
- Open the macOS System Settings like the previous method.
- Go to General and click on Software Update.
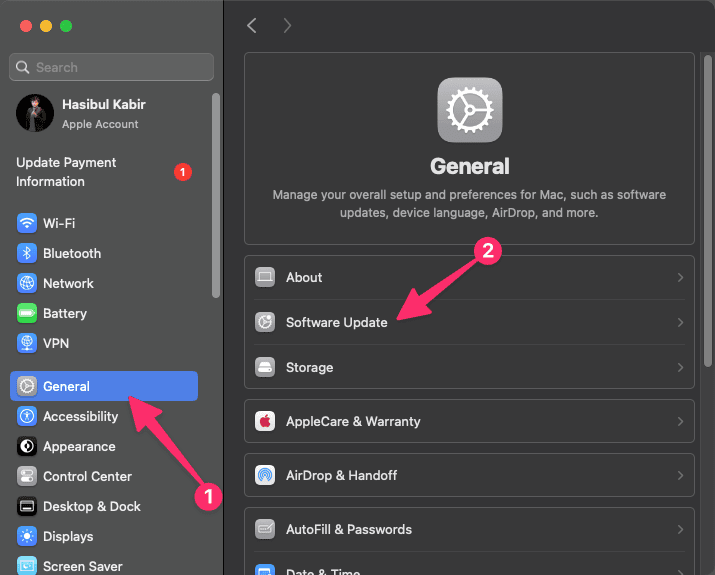
- Then, click on Check for Updates and install any available updates.
- Also, check your monitor manufacturer’s website for firmware updates and follow their instructions to update the monitor.
4. Reset NVRAM/PRAM and SMC
Resetting Mac system settings can clear display misconfiguration and fix Mac treating monitor as a TV and other related problems.
- Shut down your Mac.
- Turn it on and immediately press and hold Option + Command + P + R for 20 seconds to reset NVRAM/PRAM.
- If you're using an Intel Mac, additionally, reset the SMC by following Apple’s instructions.
5. Advanced Fix: Force RGB Mode with SwitchResX (or Terminal)
macOS may force YCbCr (TV color mode) instead of RGB (monitor color). To override this:
- SwitchResX: A paid tool, but worth it for display geeks. You can:
- Create a custom display profile
- Force RGB output
- Tweak resolutions and refresh rates
- Manual EDID Override (Terminal/Plist edit): This is for advanced users. It involves copying your monitor’s EDID, modifying it, and overriding macOS’s detection.
Open Terminal from Applications > Utilities.

Use a tool like patch-edid.rb (or similar tools) to patch the EDID for your display:
Download the script and run it in Terminal as instructed.
Restart your Mac to apply the changes. The monitor should now use RGB instead of YCbCr.
6. When All Else Fails
- Test monitor with another device (Mac, PC, even a Raspberry Pi) to confirm it’s not a hardware fault.
- Try a different monitor on your Mac.
- If none of the above resolves the issue, contact Apple Support or your monitor’s manufacturer for further assistance.
Hopefully, this will solve the monitor being treated as a TV on macOS and similar problems.
How to Prevent This Issue in the Future
To minimize the risk of macOS misidentifying your monitor as a TV:
- Use manufacturer-recommended cables and ports whenever possible.
- Regularly update your Mac and monitor firmware.
- Avoid unverified third-party adapters that might not handle EDID data properly.
- Store your display setup profile if you often move between locations or swap monitors.
Frequently Asked Questions
Q: Can forcing RGB mode or using SwitchResX harm my monitor or Mac?
A: No, these changes are software-level and easily reversible. If you encounter any issues, simply remove the custom profiles or reset display settings.
Q: Is this a macOS bug or a hardware problem?
A: It’s generally not a bug, but a result of how the monitor or adapter presents itself via EDID and how macOS interprets it. Similar problems can occur on Windows with certain monitors and cables.
Q: Why is HDMI more problematic than DisplayPort?
A: HDMI was primarily developed for televisions, so many monitors identify as “TVs” when connected through HDMI. DisplayPort is designed for computers and usually provides better compatibility with monitors.
Q: Will this issue affect both Intel and Apple Silicon Macs?
A: Yes, this issue can occur on both Intel-based and Apple Silicon Macs, as it’s related to display communication standards rather than processor type.
Q: Should I use HDMI 2.0 or 2.1 cables?
A: Using newer HDMI cables (2.0 or 2.1) may help with bandwidth and feature support, but does not guarantee that macOS will recognize your monitor correctly if EDID data is still misreported.
Final Thoughts
In summary, when macOS recognizes monitor as TV, you’re likely dealing with a simple miscommunication between your hardware and operating system. Getting your external monitor to work perfectly with your Mac can be surprisingly tricky, but don’t settle for TV mode and washed-out colors!
By following the solutions above, you can restore the correct display settings and enjoy optimal image quality on your external monitor. If it helps, let us know in the comment box below.