Few things are as frustrating during a phone or FaceTime call as hearing the person on the other end say you sound like you are underwater. Learning how to fix iphone microphone not working muffled audio can quickly get your voice back to crystal clarity.
Microphone problems usually stem from physical obstructions like pocket lint, misconfigured app privacy permissions, temporary software glitches, or protective phone cases blocking the acoustic mesh. In rare situations, physical component damage or internal hardware failures require official service.
Solutions to Fix iPhone Microphone Not Working Muffled Sound Issues
Before jumping into deep software resets or technical repairs, let us review a few basic pre-checks to narrow down the issue:
- Remove any third-party screen protectors, thick rugged cases, or protective film that might cover the top speaker or bottom microphone grills.
- Disconnect any active Bluetooth headsets, external speakers, or wireless earbuds that might be capturing audio input instead of your phone.
- Clean out obvious dust or pocket lint visible near the bottom speakers, camera modules, and receiver mesh.
- Ensure your iPhone is not connected to CarPlay or an auxiliary audio cable.
Clearing Debris and Case Obstructions
Physical debris is the single most common culprit when your caller hears low, muffled, or garbled sound. Dirt, oil, and lint aggregate inside tiny speaker grills and choke the acoustic opening.
- Remove your iPhone case and any protective wraps or camera cover skins completely.
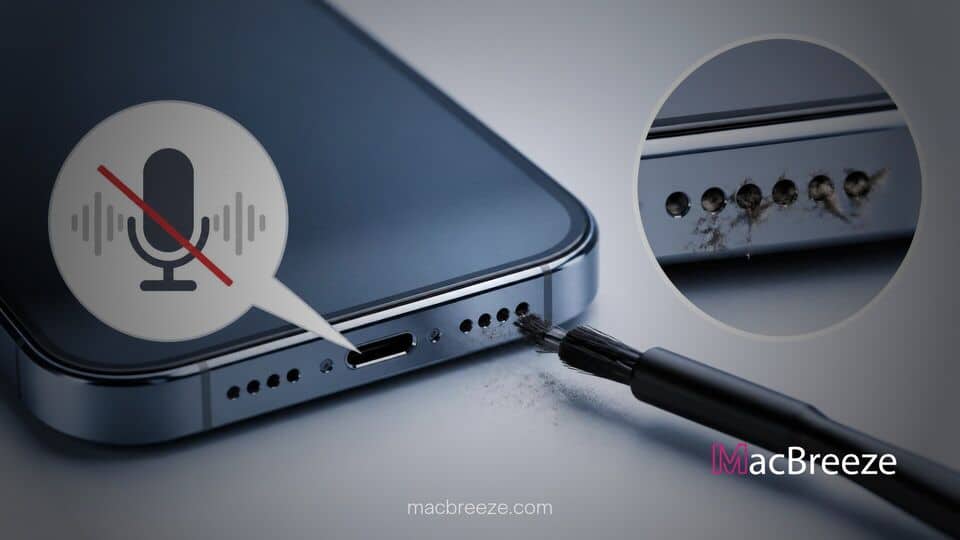
- Inspect the bottom microphone holes (located alongside the charging port) using a bright flashlight.
- Gently brush the microphone mesh using a dry, soft-bristled toothbrush or an anti-static electronic cleaning brush. Hold the phone at a slight downward angle so dust falls outward instead of deeper into the mesh.
- Carefully use a small piece of painter's tape or sticky tack to gently pull out loose pocket lint from the small holes. Never insert metal pins, safety pins, or paperclips directly into the mic ports.
- Wipe the acoustic openings around the top ear receiver and rear camera with a lint-free microfiber cloth.
Testing Front, Rear, and Bottom Microphones
Modern iPhones feature multiple distinct microphones scattered around the chassis to support noise cancellation, spatial audio, and stereo recording. Pinpointing which specific mic is failing saves valuable troubleshooting time.
- Test the Bottom Microphone: Open the built-in Voice Memos app. Tap the red record button, speak clearly into the bottom of your device, and play back the recording. If your voice sounds clean, the main microphone is operating normally.
- Test the Front Microphone: Open the Camera app, switch to the front-facing selfie camera, and record a short video while speaking. Play the video back to verify if the front microphone (located near the top ear speaker) captures crisp audio.
- Test the Rear Microphone: Switch the camera to the rear lens, record a quick video speaking behind the phone, and play it back. This tests the rear microphone placed near the camera bump used for ambient noise cancellation.
Checking App Permissions and Microphone Access
If your microphone records crisp audio inside Voice Memos but fails during WhatsApp, Zoom, or phone calls, your privacy settings or app configuration are likely blocking access.
- Open the Settings app on your iPhone.
- Scroll down and tap on Privacy & Security.
- Select Microphone from the list of permissions.
- Review the list of installed applications and toggle the switch ON (green) for any application having sound issues.
- If the app is already turned on, toggle the switch off, wait five seconds, and turn it back on to refresh the permission token.
- For phone call issues, check if third-party call filtering apps or custom audio tools are interfering. If your phone experiences broader software instability alongside audio bugs, reviewing guides on how to fix an iPhone's random restart problems can help identify underlying system faults.
Restarting iPhone and Updating iOS
Temporary software glitches, background audio daemon hangs, or pending operating system bugs frequently cause audio input channels to stop responding or sound distorted.
- Perform a soft restart: Press and hold the Volume Up (or Down) button and the Side button simultaneously until the "slide to power off" slider appears.
- Drag the slider to turn off your iPhone completely, wait roughly 30 seconds for the device to shut down fully, then press and hold the Side button until the Apple logo displays.
- After the phone reboots, check for software updates by navigating to Settings > General > Software Update.
- If a patch or system update is available, tap Download and Install. System updates routinely fix audio stack bugs and cellular audio driver conflicts. Keep your device healthy and backed up by learning how to back up your iPhone via Wi-Fi before installing large updates.
Resetting All Settings to Restore Audio Input
If basic toggles do not resolve the issue, corrupt network configurations, audio driver preferences, or system balance settings may be muting your voice.
- Open Settings and navigate to General.
- Scroll down to the bottom and select Transfer or Reset iPhone.
- Tap Reset at the bottom of the screen.
- Select Reset All Settings. (Note: This will not erase your photos, contacts, or personal data, but it will clear saved Wi-Fi networks, Bluetooth pairings, privacy choices, and system preferences).
- Enter your device passcode and confirm the reset. Once the iPhone restarts, retest your microphone in a phone call. If you also notice intermittent dropouts when placing calls over Wi-Fi calling, you may want to fix iPhone Wi-Fi connection issues to eliminate network jitter.
How to Prevent This Issue in the Future
Keeping your iPhone microphone clear requires consistent physical care and software maintenance. Regularly inspect and clean the microphone grilles with a dry micro-brush every few weeks to stop oil, lint, and cosmetics from clogging the fine mesh. Choose protective phone cases that feature precise cutouts for acoustic ports rather than generic covers that partially occlude audio channels. Lastly, always keep your iOS updated to the latest software release to prevent driver glitches and back up your device locally using solutions like local backups versus iCloud to keep your audio configurations safe.
Conclusion
Resolving audio hardware issues does not always mean taking an expensive trip to the repair shop. Following these easy troubleshooting steps will help you fix iphone microphone not working muffled audio so your calls, voice notes, and videos sound clear once again. If your microphone remains silent after a complete software reset and thorough cleaning, contact Apple Support or look into official AppleCare coverage options to inspect for hardware damage.