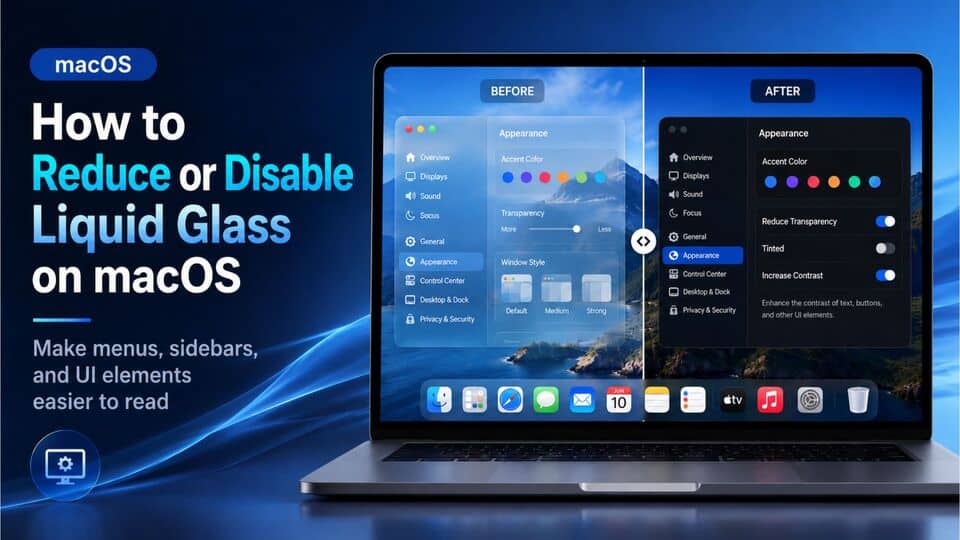
Liquid Glass is the new visual design style introduced in macOS Tahoe. It gives menus, sidebars, the Dock, widgets, and other interface elements a transparent, glass-like appearance. While the design looks modern, some Mac users find it distracting, harder to read, or uncomfortable during long work sessions.
The important thing to know is this: macOS Tahoe does not provide a single switch that completely restores the old pre-Tahoe interface. However, you can significantly reduce the Liquid Glass effect using built-in macOS settings. In many cases, these changes make menus, windows, and system elements look more solid and easier to read.
Can You Completely Turn Off Liquid Glass on macOS Tahoe?
Not completely. Apple does not currently offer a full “Disable Liquid Glass” option that removes the new design everywhere. Some parts of the macOS Tahoe interface will still keep the newer visual style.
However, you can reduce the most distracting parts of Liquid Glass by enabling Reduce Transparency, using the newer Tinted Liquid Glass option where available, increasing contrast, reducing motion, and choosing a calmer wallpaper.
Best Ways to Reduce Liquid Glass on macOS Tahoe
Start with the built-in macOS settings below. These are safer than using unofficial tools or system modifications.
1. Turn On Reduce Transparency
This is the most effective built-in setting for reducing the see-through Liquid Glass effect. It makes many interface areas more solid, including menus, the menu bar, sidebars, and other translucent system elements.
- Click the Apple menu in the top-left corner of the screen.
- Open System Settings.
- Select Accessibility from the sidebar.
- Click Display.
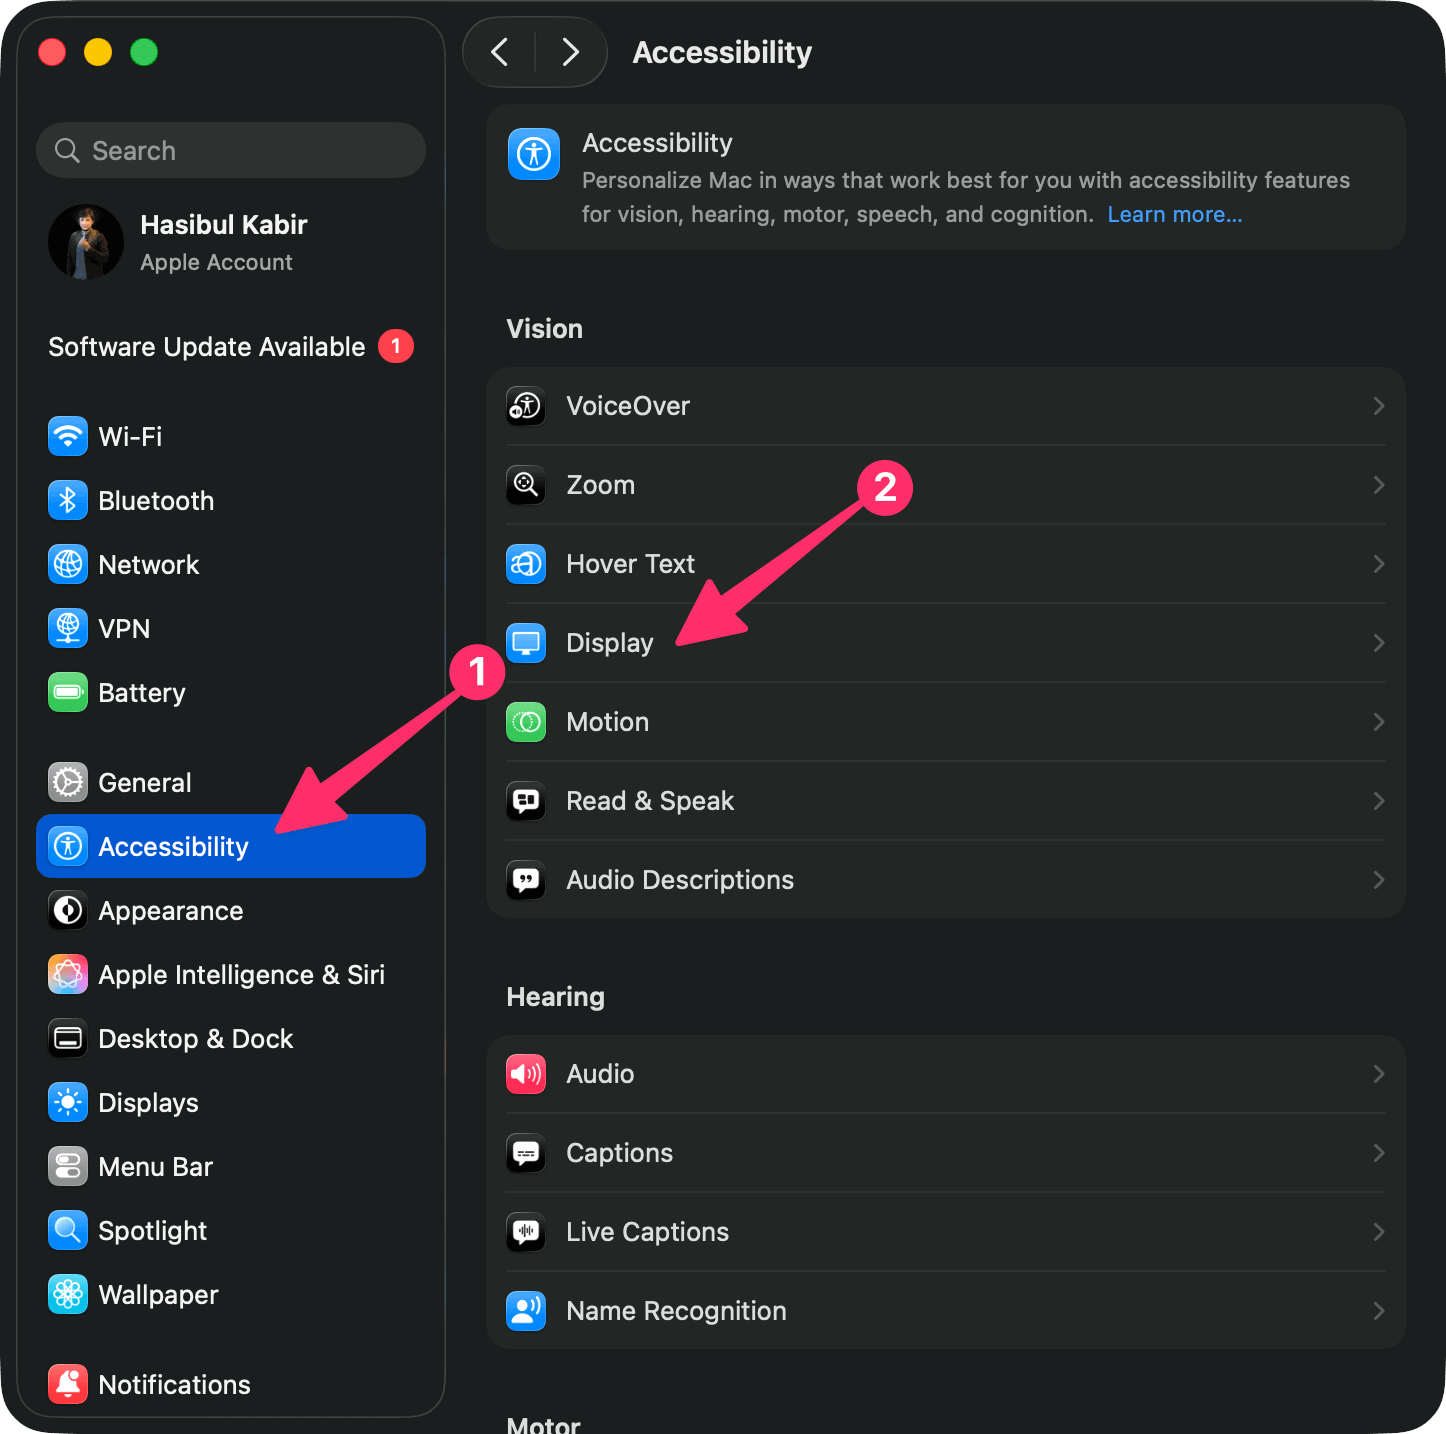
- Turn on Reduce Transparency.
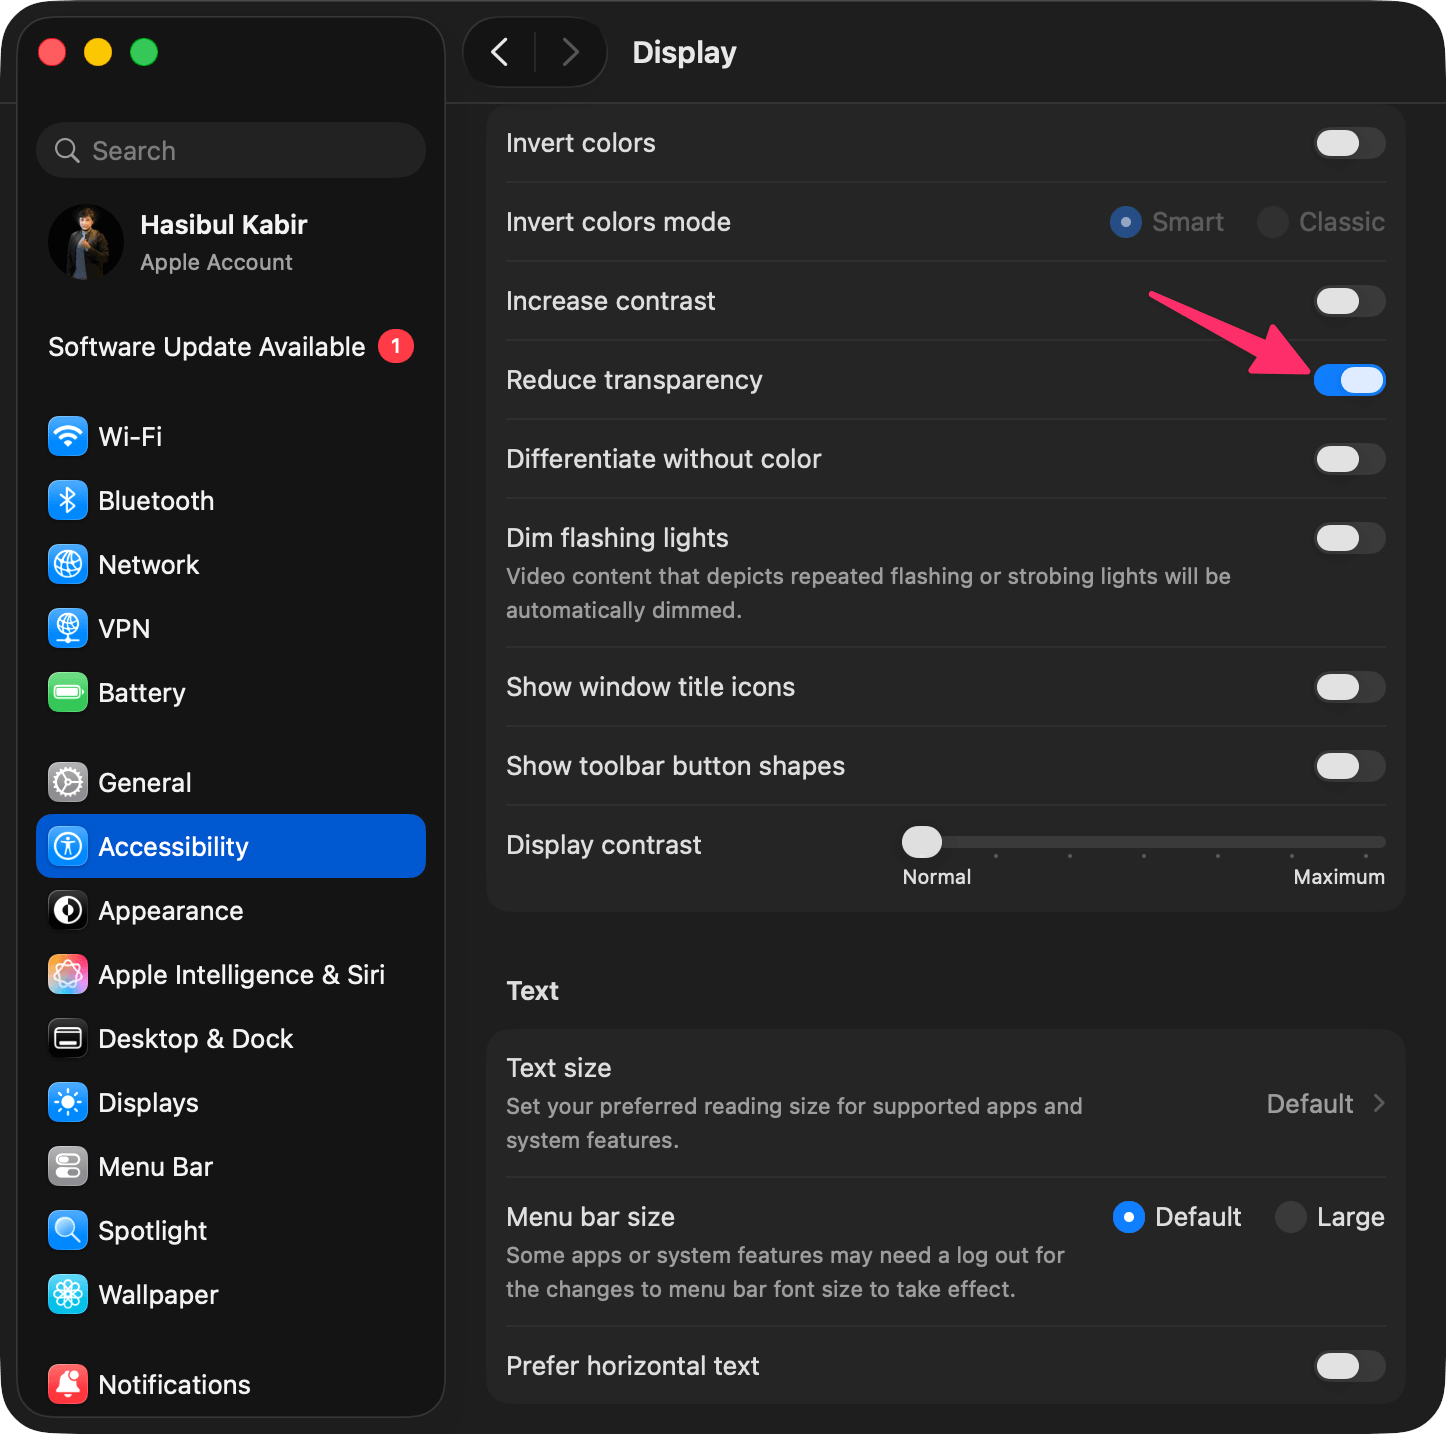
The change should apply immediately. You should notice that the menu bar, menus, sidebars, and several system surfaces become less transparent and easier to read.
When should you use Reduce Transparency?
- If menus or sidebars look too transparent
- If text is difficult to read over bright or busy backgrounds
- If the glass effect feels distracting
- If your Mac feels visually uncomfortable during long sessions
- If you prefer a more solid, less flashy interface
2. Use the Tinted Liquid Glass Option on macOS Tahoe 26.1 or Later
Apple added a Liquid Glass appearance option in macOS Tahoe 26.1. This lets you choose between the default clearer look and a more opaque Tinted look.
If your Mac is running Tahoe 26.1 or later, try this setting:
- Open System Settings.
- Go to Appearance.
- Look for the Liquid Glass section.
- Select Tinted instead of Clear.
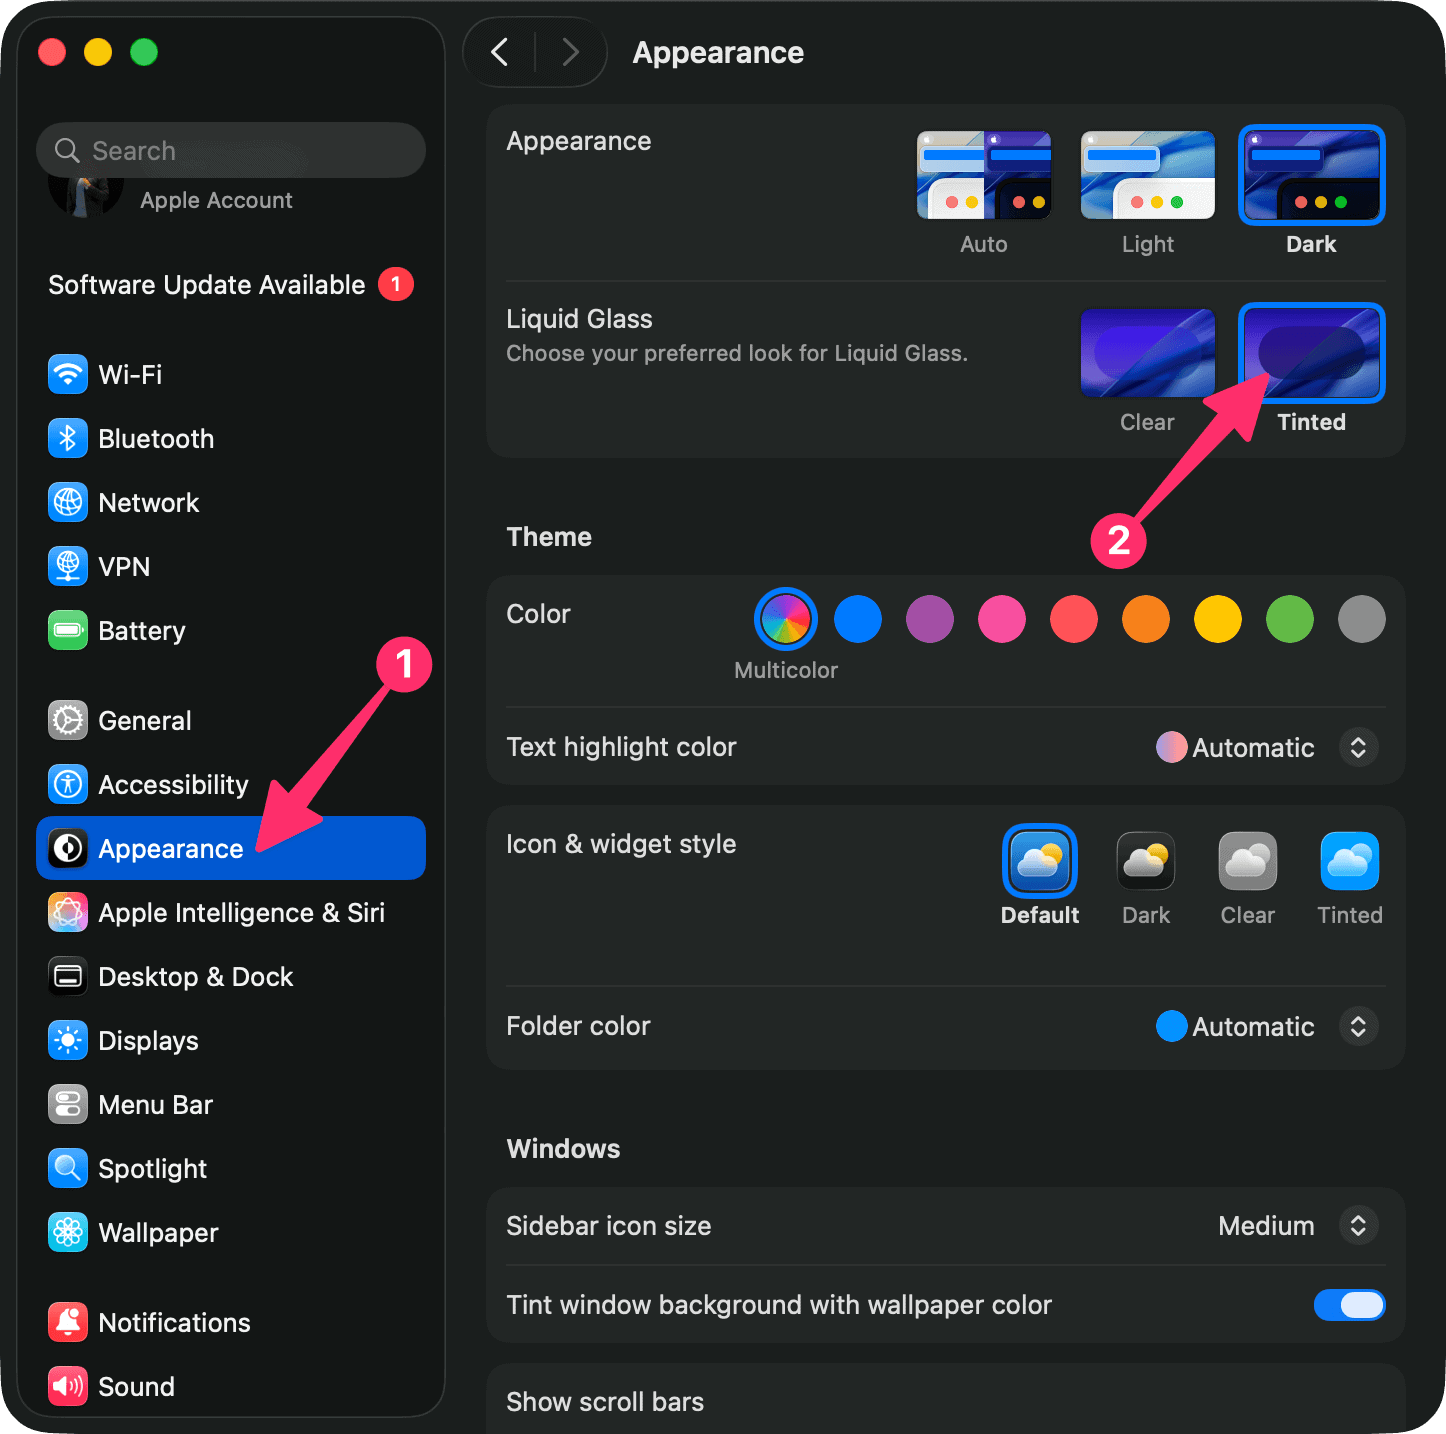
The Tinted option does not remove Liquid Glass completely, but it can make the interface feel less transparent and more readable. It is a good option if you still like the Tahoe design but want it toned down.
Reduce Transparency vs Tinted: Which One Is Better?
| Setting | Best For | Effect |
|---|---|---|
| Reduce Transparency | Maximum readability | Makes many glassy areas more solid |
| Tinted Liquid Glass | A softer version of the Tahoe design | Keeps the new style but increases opacity |
| Increase Contrast | Clearer borders and stronger separation | Makes UI elements easier to distinguish |
| Reduce Motion | Less animation and visual movement | Makes the interface feel calmer |
3. Turn On Increase Contrast
If Liquid Glass makes buttons, windows, menus, or sidebars difficult to separate visually, Increase Contrast can help. It adds stronger borders and makes interface elements easier to distinguish.
- Open System Settings.
- Go to Accessibility.
- Click Display.
- Turn on Increase Contrast.
This setting may also make the interface look slightly less soft or modern, but it can improve readability a lot, especially if you work on your Mac for long hours.
4. Turn On Reduce Motion
Liquid Glass is not only about transparency. Some users also dislike the animations and movement effects in macOS Tahoe. If the interface feels too animated or visually busy, enable Reduce Motion.
- Open System Settings.
- Go to Accessibility.
- Click Display or Motion, depending on your macOS version and layout.
- Turn on Reduce Motion.
This will not remove Liquid Glass by itself, but it can make macOS feel calmer and more comfortable.
5. Use a Simple Wallpaper
Because Liquid Glass reflects and blends with what appears behind it, your wallpaper can make a big difference. Bright, colorful, or high-contrast wallpapers can make transparent menus and sidebars feel more distracting.
To reduce the visual impact:
- Open System Settings.
- Go to Wallpaper.
- Choose a simple, dark, neutral, or low-contrast wallpaper.
A plain wallpaper can make the remaining glass effect less noticeable, especially in the menu bar and transparent areas.
6. Try Dark Mode
Dark Mode can make the Liquid Glass effect feel less harsh for some users, especially at night or in low-light rooms.
- Open System Settings.
- Go to Appearance.
- Select Dark or Auto.
This is not a direct Liquid Glass setting, but it can make the overall interface easier on the eyes.
7. Optional: Use Terminal to Enable Reduce Transparency
If you prefer using Terminal, you can enable the same Reduce Transparency setting with a command. This does not unlock a hidden full Liquid Glass disable mode. It simply turns on the macOS accessibility setting.
Open Terminal and run:
defaults write com.apple.universalaccess reduceTransparency -bool trueThen restart your Mac or log out and log back in.
To turn it off later, run:
defaults write com.apple.universalaccess reduceTransparency -bool falseAfter running the command, you can also check the setting manually in System Settings > Accessibility > Display.
Should You Use Third-Party Tools to Disable Liquid Glass?
Be careful with third-party tools that claim to fully disable Liquid Glass, remove rounded corners, patch system files, or restore the old macOS interface. Some of these methods may require disabling security features, changing protected system files, or applying unofficial tweaks that can break after a macOS update.
For most users, it is better to avoid these tools and use the built-in settings instead. If you still decide to try an advanced tweak, make a full backup first and understand that the change may stop working after future macOS updates.
Recommended Settings for a Less Glassy macOS Tahoe
For the best balance of readability and safety, try this combination:
- Turn on Reduce Transparency
- Use Tinted Liquid Glass if your Mac has macOS Tahoe 26.1 or later
- Turn on Increase Contrast if text and borders still feel unclear
- Turn on Reduce Motion if animations feel distracting
- Use a simple dark or neutral wallpaper
- Try Dark Mode if the interface feels too bright
Why Liquid Glass May Still Appear After Changing Settings
Even after enabling Reduce Transparency, some parts of macOS Tahoe may still look different from older macOS versions. This is normal because Liquid Glass is part of the system-wide design language in Tahoe. The settings above reduce the effect, but they do not completely remove every visual change.
Final Thoughts
You cannot fully disable Liquid Glass on macOS Tahoe with one official switch, but you can make it much less distracting. The safest and most effective fix is to enable Reduce Transparency from Accessibility settings. If you are using macOS Tahoe 26.1 or later, you can also try the Tinted Liquid Glass option for a more opaque look.
For most users, these built-in options are enough to make macOS Tahoe clearer, calmer, and easier to use without relying on risky third-party modifications.